
WARNING! The installation procedure described in section 6 is obsolete as of May 6th, 2019. For much easier, ISO-image installation based on Fedora 30 Remix, please see document Untochat - Secure and Anonymous Chat Infrastructure.
The system overview and chat infrastructure's technical documentation presented here is still mostly valid.
Untochat current RPM packages for Fedora 28
In our earlier tutorial Secure private IRC server with Tor support we sketched an outline of one possible way of constructing a pretty secure chat server using Tor Onion services. Practical advice was also given in the form of shell commands and configuration file examples. However, we acknowledged that our model had one serious security related weakness: It allowed chat users full shell access to the chat server. So the chat service was useful to only groups that had trusted users. That is the issue we aim to address in this article. We now wish to limit the chat users so that even if untrusted infiltrators could get in, they would not be able to do much harm to our system.
Because this model makes use of Tor Onion services, we need to address the issue of anonymity too. It is not enough that chat users cannot elevate their privileges to compromise security, we must also do everything we can to hide the identity of our server during normal operation. In other words, chat users should be kept in the dark as much as possible. For example, we must not reveal:
In short, the less the chat users know about us, the better. Some people may scornfully call that "security by obscurity", but our security model is not based on hiding facts. And as we already said, running Tor Onion service requires anonymity, so we firmly believe our approach is correct. Just think about national secret services, or even secret agents if you will. Does the general public know what they are up to? Of course not. They keep the details to themselves in order not to help their enemies in any way.
When feasible, we have tried to adhere to the following principles:
We consider regular chat applications such as those found on smart phones to be almost totally untrustworthy. Despite the noble claims about security and privacy, we are convinced that popular chat systems are constantly being watched by governments with the help of greedy companies. That is why safe alternatives are sorely needed. We aim to provide one possible solution here.
Setting up a properly configured Untochat server requires a certain amount of computer skills, but it should be doable if you have some Linux experience and you can follow instructions. We have done our best to automate the installation and configuration process as much as possible. Once Untochat is up and running, accessing it as a regular chat user is not a difficult task.
It is our hope that Untochat infrastructure could be useful to e.g. human rights activists, revolutionaries and oppressed groups all around the world. In particular, we support the mission of Brotherhood of Eternal Love. We are talking about a global group of friends who wish to make this world a better place. Brotherhood of Eternal Love was formed in California back in the 1960s and they have not looked back since. It is sad that due to inhuman laws and general ignorance, this highly advanced activist group must currently operate underground to avoid persecution and imprisonment. We must do everything we can to help them.
Another purpose of Untochat is to serve as an educational tool. We have attempted to document most of the features in some detail, so studying and playing with this system could help you to learn more about Linux. Being involved in the Untochat project, we know that we have learned a lot from many helpful hackers. They have shared their knowledge for free and we wish to follow their footsteps by sharing all that we have learned.
A wise man sang "It's a game of give and take" on Santana's fine album Borboletta in 1974. Those lyrics contain a deep, universal truth that never gets old.
This document consists of two main parts. The earlier sections describe Untochat's overall structure. Some of the explanations will be very technical and detailed, but do not worry if you cannot understand it all. It is not our intention to overwhelm potential users by providing too much information. The detailed explanations are strictly for those who wish to understand the workings of this system on a deeper level. Successfully operating Untochat does not require perfect understanding of the details involved.
The later sections will show you how to apply the theory into practice. With patience and effort, you can actually have your personal Untochat server running in a pretty short time. But it is likely that there will be some obstacles, so do not give up if it does not work out right away.
We plan to support Untochat on future Fedora Linux releases, too. Backporting Untochat to CentOS is a possibility we seriously consider. After all, Fedora Linux is a somewhat experimental OS that moves ahead pretty quickly, so CentOS could potentially provide us with a more stable, long-support platform.
CentOS is almost completely based on Red Hat Enterprise Linux, a highly advanced and stable commercial Linux distribution. If you work for a company that needs stable Linux servers with professional IT support from the leading experts in the field, we recommend considering Red Hat Enterprise Linux. It is a very affordable, top quality product. We do not claim RHEL is perfect, because all modern operating systems have some flaws simply due to their enormous complexity. We just know that we have operated RHEL servers for several years, and they have worked very well for us.
We initially called this system Secchat (for "secure chat"), but later found out that that name was already being used by other projects. Needing a new name, we thought about it for a short while and just decided to call it Untochat. This choice is not based on Unto Sten's egoism at all - the name is suitable because we believe it is likely to remain unique in the future.
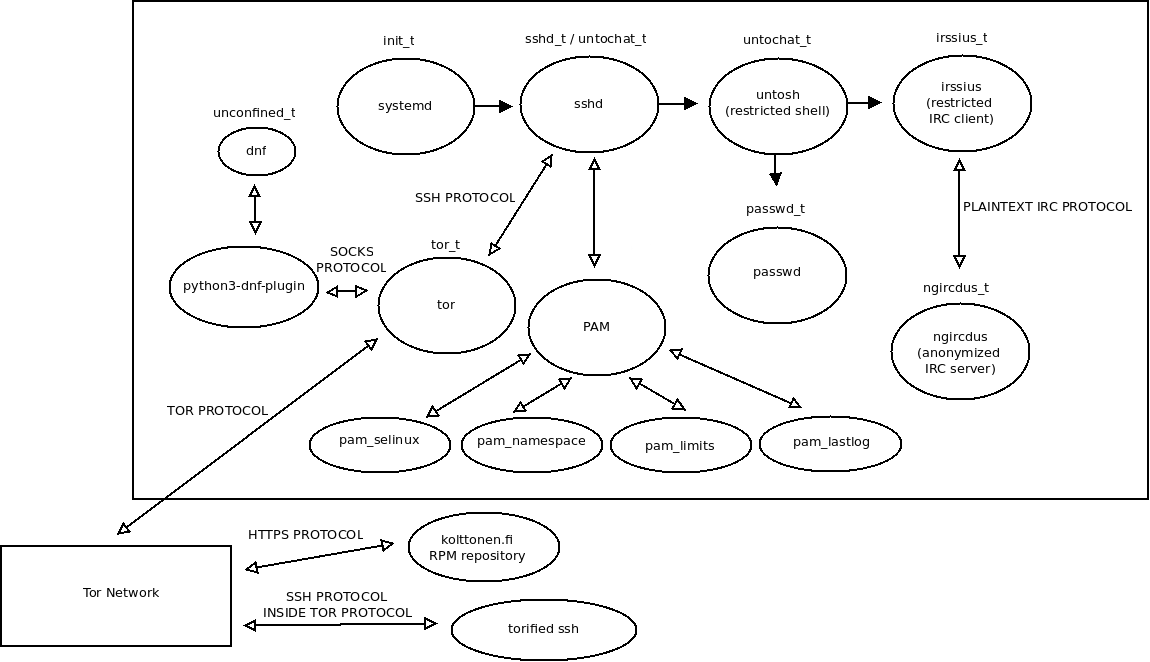
Below is a simplified diagram of the system. Strictly speaking systemd is not part of Untochat. It is not aware of Untochat in any way, but we have shown it here for completeness. Or to be clear, systemd does control ngircdus, Untochat's customized IRC daemon, so in that respect systemd is a little bit aware of Untochat. But the role of systemd is not that big when it comes to Untochat.
As you may already know, systemd is the first userspace process started by Linux kernel. Kernel always gives it PID 1 (process id). Thinking of a modern Linux system as a whole, this daemon is very important and it is responsible for bringing up services, monitoring them, and many other things. Compared to older init daemons, systemd is a very complicated and large system. We have shown systemd here mainly because it starts sshd (OpenSSH daemon) to allow our chat users to login.
But let's ignore systemd for now and move on to describe the Untochat infrastructure. The associated SELinux security domains are listed above each process. Of those domains, only untochat_t, irssius_t and ngircdus_t were created by us. They are unique to Untochat. Other security domains are defined in selinux-policy-targeted RPM package distributed with Fedora Linux 28.
When a chat user logs in using a "torified" ssh client program, it contacts Untochat's Tor daemon. The meaning of "torified" will be explained later. Tor daemon forwards the user's connection to sshd. SSH daemon then verifies that the user can login. If the login is allowed, sshd does SELinux domain transition into untochat_t security domain. It then executes our restricted custom login shell untosh. After that user is logged in and untosh also runs contained inside untochat_t security domain. It inherits untochat_t from its parent process sshd, so no domain transition occurs there.
The untosh shell is a pretty simple C program. It is very limited by design. Unlike normal shells such as bash, ksh, zsh or tcsh, untosh is a special-purpose program written exclusively for Untochat.
Client program irssius is nothing more than a restricted version of irssi IRC client.
Daemon ngircdus is just a very slightly modified ngircd IRC server program.
As you can see in the diagram above, the communication channel between irssius and ngircdus is not encrypted. The IRC client and the IRC server use plaintext IRC protocol. This is considered safe, because both processes run inside the same machine. It would be possible to make them use SSL/TLS encryption, but we have chosen not to do so, because in this model the administrators have to be totally trusted anyway. Even if IRC communications were encrypted using SSL/TLS, the admin would have ways of snooping the data.
Tor daemon is of course also running on our server, but we have omitted it here for simplicity. Although Tor as a whole is very complicated, running Tor Onion Service and configuring tor as a client is not that difficult. So we first focus on Untochat specific system components that require more attention. Tor's role will be explained later in section Offering sshd as Tor Onion Service.
Other important system components such as iptables and pam will also be described later in this document.
In this section we will give a more detailed description of our system's main components.
This is chat user's SSH client program. It is used to login in order to chat: ssh runs on user's personal computer, not on our chat server. But we have shown it for completeness and because without users, the chat server is useless. However, the SSH client needs to be torified before it can access our Tor Onion Service.
For good instructions on how to "torify" your SSH client, see Tor Project's TorifyHOWTO document.
Many people may wonder what does it even mean to "torify" an application like ssh. And how does torsocks "torification" method of ssh work? If you are not interested in technical details, you can skip this explanation. We were very curious and examined what torsocks program does, not really knowing what to expect. It turns out that in fact torsocks is just a simple shell script. It is a wrapper that uses LD_PRELOAD environment variable to force the Linux runtime linker /lib/ld-linux.so.2 to preload symbols from libtorsocks.so shared library before standard shared libraries. The purpose is to override normal program code behavior.
Now after that hack, many library function calls that ssh makes no longer enter operating system's standard shared libraries. Instead torsocks forces ssh to use alternative functions provided by Tor Project's custom libtorsocks.so shared library. The alternative functions are known and accessible to ssh because their symbols and signatures (i.e. names, calling interfaces and return types) in the libtorsocks.so are exactly the same as in standard libaries. Let's take a practical example: "torified" ssh calls connect() to create a direct TCP connection to the Internet, but it has no idea that the standard connect() function has been replaced by torsocks to redirect ssh connections through the Tor proxy daemon.
This is what "torification" means regarding torsocks and ssh. You should understand that the ssh client program binary or source code is not modified in any way, nor is ssh even aware of being "torified". It knows nothing of torsocks doing LD_PRELOAD. That is why you can keep using your usual SSH client program. You just need to have Tor programs available and running.
To sum it up, the purpose of torification is to redirect SSH connections through Tor proxy daemon. That makes the connections anonymous and it also allows access to Tor Onion Services such as Untochat.
As a sidenote related to SSH and Tor, fortunately there exists a special-purpose security oriented operating system called Tails. It is based on Debian GNU/Linux and we believe Tails is quite secure and anonymous. So users wishing to have a very good level of security and anonymity could use Tails to connect. Tails comes with Tor enabled by default, so it is easy for users to use, requiring no extra configuration.
We are not security experts, but for improved security and anonymity, we think it is safe to at least suggest trying out Tails. You can run Tails using a USB stick and it leaves no traces on your computer. But you can use any operating system that can run Tor client and SSH client that is "torified".
We believe that one significant advantage of our secure chat infrastructure is that it is relatively easy for users to use. It requires only a "torified" SSH client and nothing else. The chat server's administrator is responsible for providing and maintaining all other system components, so regular chat users do not need to worry about many technicals details.
OpenSSH daemon sshd is responsible for user logins over the network. It is the version that ships with Fedora Linux, so it contains some Red Hat Linux custom patches. We have made no modifications to the source code. The RPM package comes straight from Fedora Linux's standard repositories.
We have configured /etc/ssh/sshd_config like this:
/etc/ssh/sshd_config. We removed pam_lastlog.so module's argument showfailed in file /etc/pam.d/postlogin. So that change affects all PAM-aware programs that use /etc/pam.d/postlogin.untochat or wheel.sftp service.In addition we have modified /etc/crypto-policies/config by replacing setting DEFAULT with FUTURE. That change affects some applications. OpenSSH is among them and it makes sshd to use and require stronger cryptography. This setting might cause problems for some older SSH clients that can use only weaker cryptography. We do not know for sure.
We have also verified that commands scp and sftp do not work for restricted chat users, so they cannot transfer files. Using normal login shells it can be difficult to allow ssh access and deny scp, but making untosh the login shell disallows scp. That is exactly what we want.
Initially sshd daemon runs in SELinux domain sshd_t. This daemon is special when it comes to SELinux: sshd must know how to map Linux users to specific SELinux users. For example, normal Linux admins should be mapped to user unconfined_u, but our restricted chat users must enter their own confined domain. We will next explain how we think it works.
PAM configuration file /etc/pam.d/sshd defines that pam_selinux.so PAM module is required to succeed for session. So at login time sshd calls PAM library. That library processes the entire PAM stack defined in /etc/pam.d/sshd and when it is time, it calls pam_selinux.so for help with SELinux. The pam_selinux.so finds out the correct mapping from a Linux user to a SELinux user. It does that by calling SELinux library function getseuserbyname(). On Fedora Linux running targeted SELinux policy, the mapping information is stored in file /etc/selinux/targeted/seusers.
The module then verifies that the target SELinux context is valid. After that it calls its internal function set_exec_context() to set the proper SELinux context for the next exec() system call. The internal function calls SELinux library function setexeccon() that actually does the job. When program control returns from PAM module to sshd, the daemon will execute untosh in the proper SELinux context.
So sshd explicitly requests a domain transition from sshd_t to untochat_t based on its knowledge about the Linux user and the desired mapping to a specific SELinux user.
At some point the sshd daemon process that is handling the login also sets its own process domain to untochat_t. We did not examine when or how that happens. Presumably it calls setcon() after pam_selinux.so has given it the correct target context.
By the way, it is much more common that SELinux enabled kernel automatically performs domain transitions without requests coming from userspace programs like sshd. Kernel does that based on rules defined in the SELinux policy it has loaded into kernel memory. In the case of sshd automatic domain transition is not possible, because kernel does not know about the Linux user who is logging in - only sshd knows about it. Thus the domain transition must be dynamic, i.e. it is determined at run-time and not in the SELinux policy. Of course the kernel still validates the requests from userspace by checking its policy.
Borrowing heavily from selinux-policy-targeted rule base, we have created a brand new SELinux user called untochat_u. All Untochat users must be mapped to this SELinux user when they login. This means that when adding users to the system, it is crucial to set the correct SELinux user. Otherwise they will enter unconfined_t and our SELinux rules will not apply to them. To guard against admin's mistakes, we have set the default SELinux user to be untochat_u. We have also created admin tools that we recommend to be used when managing Untochat users.
To make new untochat_u known to SELinux, and by implication to sshd, we have created a file /etc/selinux/targeted/contexts/users/untochat_u. But that file only defines the domain transitions. It is our custom SELinux policy module untochat.pp that defines and creates the SELinux user untochat_u, the related role untochat_r and the domain untochat_t.
We still have one final remark to make concerning sshd SELinux workings. For reasons not known to us, sshd does a domain transition to sshd_net_t in its pre-auth login phase. We are convinced there is a good reason for that, but we have omitted the sshd_net_t transition from the overview diagram that we showed earlier. In the diagram we have a direct transition from sshd_t to untochat_t, but strictly speaking that description is not accurate.
This is Unto's restricted shell, hence the name untosh. All Untochat chat users must have /opt/bin/untosh as their login shell. The /opt/bin/ path to untosh is special and meaningful to SELinux, so the location of untosh must not be changed. SELinux knows that /opt/bin/untosh should have file context system_u:object_r:untosh_exec_t:s0.
This shell creates an exclusive lockfile $HOME/untosh_lockfile so that only one login session per user is allowed at a time.
On startup, untosh first verifies the following things:
uid or euid must not equal 0 (zero means root/superuser).untochat.untochat_u:untochat_r:untochat_t:s0.If all of those requirements are not met, untosh will refuse to run and will call exit(EXIT_FAILURE) immediately.
As you can see, untosh is not only under SELinux policy control, it is aware of SELinux. Requiring a specific SELinux process context implies that SELinux must be running, but for testing purposes it can of course run in permissive mode.
This shell requires the following environment variables to be set to sane values by the caller (e.g. sshd when logging in users):
USERHOMETERMLANGWhen untosh executes programs, it passes on only TERM and LANG environment variables. Without them, irssius terminal would not work properly with UTF-8. USER is only for displaying login name in the untosh shell prompt. HOME is used to change to user's home directory and to create exclusive lock file $HOME/untosh_lockfile.
Four commands are accepted:
irssius to run irssius (restricted version of irssi)i is a convenience alias for irssius (just faster to type)passwd so that users can change their own passwordexit to exit the shell and quit the login sessionAll other commands are denied by untosh. These limitations are enforced not only by untosh's own userspace C code, but also by kernelspace SELinux security policy (i.e. untosh being contained inside untochat_t domain).
Internally untosh is quite simple and we hope it is safe. This shell has no configuration files and it has extremely limited features. User's commands can make it execute one of these two hardcoded commands:
/opt/bin/irssius -c 127.0.0.1 -p 6667/usr/bin/passwordChanging that behaviour requires modifying untosh source code and recompiling. SELinux policy concerning domain untochat_t would possibly have to be updated as well, depending on the changes.
The rule of the thumb is that signals sent either to untosh or its child processes always cause untosh to exit. On standard Unix, signals SIGKILL and SIGSTOP can never be caught, so they kill or stop the process. There is nothing we can do about that unless we modify the kernel and that would make no sense at all.
This is irssius, that is irssi + us, meaning Unto Sten's restricted and anonymized special version of that famous IRC client program irssi. Like with /opt/bin/untosh, the file location /opt/bin/irssius is meaningful to SELinux and must remain constant. SELinux knows it should have file context system_u:object_r:irssius_exec_t:s0.
In our opinion irssi is one of the best IRC clients. No flashy GUI with fancy features is needed, because chatting is essentially a text-based activity. We want to provide a simple, safe and anonymous way to communicate. For that purpose, a traditional irssi user interface based on ncurses terminal library works very well. It is indeed easy to use once you have learned it. There is no mouse support, though, so users have to use their keyboard.
We are happy with the ncurses-based user interface and like to use it. But out of the box, stock irssi is not at all suitable for Untochat's purposes. That is why we have spent some time removing unwanted features and doing other minor modifications.
The following modifications have been mode:
irssi commands have been disabled in irssius. We added a simple filtering function int is_okay_command(const char *command) just before the place where commands are parsed. Our function allows just a limited basic set and rejects everything else. So by default we deny. See /HELP command when in irssius to see the supported commands.unsigned long int get_random_time(void). It is used to randomize some timestamps that irssius shows (i.e. channel creation time, topic creation time). The implementation is as simple as it can be, but it requires /dev/urandom pseudo-device to be available. Note that randomization is absolutely necessary. Always returning a hardcoded, fixed timestamp would reveal our server's timezone, because our potential enemies know that value and they can observe which timestamp is printed when they run irssius.startup file is never read or executed.irssi, irssius never shows the IRC user when the day has changed. If it did, it would reveal the Untochat server's timezone. We actually caught that vulnerability completely by accident when the day changed and we just happened to be testing irssius. We hope there are no more nasty surprises like this that we have ignored.fork() has been removed. It is also denied by irssius_t domain's security policy. Standard irssi uses fork() to create a child process that does non-blocking connection to the IRC server. We do not need that, and more importantly we want to limit the maximum number of processes that is allowed to Linux group untochat. We have defined the maximum number of processes hard limit in /etc/security/limits.conf and it is exactly 3 (i.e. sshd + untosh + irssius or sshd + untosh + passwd). If the maximum process count is ever exceeded, Linux kernel makes fork() system call to fail with error code EAGAIN ("Resource temporarily unavailable"), and that is precisely what we want.irssi has that /EXEC command that makes the program practically an interactive command shell. You can freely run programs using it, so /EXEC is quite horrible from Untochat's point of view. We have disabled it, and we have also verified that our SELinux policy prevents irssius from executing /bin/bash. It means that we have double protection, both in userspace and kernelspace.Even though the list above may seem long, all the changes were small and pretty elementary. But despite our efforts, we are not absolutely sure whether irssius is now completely anonymized. We may well have ignored something important.
We believe that irssius is secure. It runs contained inside our custom irssius_t security domain. We have tried our best to make irssius_t domain restrictive.
We have also modified irssius source code to make the IRC client aware of its required SELinux process context. On startup, irssius first verifies the following things:
uid or euid must not equal 0 (zero means root/superuser).untochat.untochat_u:untochat_r:irssius_t:s0.If all of those requirements are not met, irssius will exit immediately.
Many unneeded compile-time features have been disabled.
This is ngircdus, that is ngircd + us, meaning Unto Sten's anonymized special version of Next Generation IRC daemon ngircd. We did not make many changes. Our version is almost identical to the original.
We have tried to make sure that the IRC server's Welcome Message does not reveal facts about our hardware or operating system. We also show false statistics about the IRC server in the Welcome Message, i.e. all counters are displayed as having value zero.
We have modified ngircdus in the following ways:
ngircdus verifies that both the source IP address and the destination IP address (i.e. its own) is 127.0.0.1. In other words, only loopback device address is allowed. If that condition fails, the situation is very serious and ngircdus will exit.ngircdus requires that the user's requested IRC nickname matches user's Linux login name exactly. Otherwise LOG_ALERT condition is logged and the client's connection is rejected.untochat are never allowed to use /OPER to become IRC Operators.wheel or group ircoper can become IRC Operators without password using /OPER, just based on their Linux group membership. But if a user belongs to group untochat IRC Operator status is always denied, even if the user is also a member of wheel or ircoper./OPER.LOG_ALERT and client's IRC connection is terminated. We considered allowing group wheel and group ircoper to change their nickname to hide their login name. However, we came to the conclusion that it is a pretty clean and simple policy to deny that right from everybody. This may have to be reconsidered later, though.Note that unlike traditional IRC servers, ngircdus does not use Ident protocol to find out the IRC clients' login names. We investigated that possibility, but did not want to run additional Identd server in our Untochat infrastructure. We want to keep things simple, so we took some code ideas from oidentd and now ngircdus gets the user information straight from the Linux kernel by reading /proc/net/tcp. This is a bit of hack, but apparently netstat utility also uses /proc to retrieve information. In the oidentd Linux-specific code, reading /proc/net/tcp is just a fallback if the Netlink method is not supported.
When systemd starts ngircdus IRC daemon, systemd follows rules it has read from /usr/lib/systemd/system/ngircdus.service unit file. There is nothing special about that, it is standard behaviour. But based on the settings defined in the unit file, systemd enforces some security related restrictions on ngircdus.
For example, systemd totally hides certain directories like /home from ngircdus. It does this by using Linux kernel's namespace feature. We wish to make it clear that not all of these systemd-based restrictions are our additions. The original ngircd unit file already contains many security enhancements. We only extended them a little bit.
Like other components of Untochat, ngircdus runs under SELinux security control - in this case contained inside ngircdus_t domain. We have created the SELinux custom policy for ngircdus and it is intended to be restrictive.
We already pointed out earlier that the file locations /opt/bin/untosh and /opt/bin/irssius are special to SELinux. This is also true of the location /opt/sbin/ngircdus. SELinux knows that the executable should have file context system_u:object_r:ngircdus_exec_t:s0. That is why the location must not be changed.
We have slightly modified ngircdus source code to make the daemon aware of its required SELinux context. On startup the daemon first checks that its process context matches system_u:system_r:ngircdus_t:s0. If the check fails, it refuses to run.
Configuring ngircd and ngircdus is pretty straightforward. We have tried to make the configuration file settings secure and anonymous. For instance:
ScrubCTCP = yes.ngircdus never connects to other IRC servers because of ConnectIPv4 = no and ConnectIPv6 = no.MorePrivacy = yes.Using compile-time options, we have removed many unneeded shared library dependencies so the resulting /opt/sbin/ngircdus binary is kept as simple as possible.
This is our custom SELinux policy module that adds a new untochat_u:untochat_r:untochat_t security context so that SELinux can use it. When Untochat users login using "torified" SSH clients, SELinux maps them to SELinux user untochat_u. Note that this component is not a running process or a system daemon. It is simply an SELinux policy extension. It depends on SELinux rules and definitions specified in Fedora Linux/Red Hat Enterprise Linux/CentOS default RPM package selinux-policy-targeted.
We have created untochat_u based on existing Fedora Linux 28 guest_u to allow it to login, but we have tried to remove all exec() rights except for SELinux file contexts passwd_exec_t, untosh_exec_t and irssius_exec_t. We are not SELinux experts, but we have tried to do some SELinux policy analysis using sesearch and sedta in order to find and eliminate all unwanted allow rules and domain transitions.
Those tools proved to be very valuable indeed. We firmly believe they can reveal unexpected facts that manual inspection is likely to miss. We must learn more about SELinux policy analysis and we recommend that others use analysis tools, too.
When creating a new SELinux policy, on the one hand using pre-defined m4-macros is often helpful and desirable. It could make your module's code shorter and easier to understand. But on the other hand it can be dangerous for the following reasons:
m4-macro definition might not be what one expects it to be. The macro could possibly allow too many rights and worsen security.m4-macro definition that you knew to be safe could change in a negative way when new SELinux base policies are released. In that case your policy module would look like before and you would consider it to be safe, not knowing that things have changed behind your back.Writing allow rules manually, one by one, may sometimes feel like a tedious job. However, by using that method you will know exactly what you will get.
Untochat also includes additional components that we will describe here. These are also very important, but we omitted them from the main diagram for clarity.
Tor is security and anonymity software built by www.torproject.org. The name "Tor" is used when referring to:
tor used to implement Tor protocolThe different word usages can sometimes lead to confusion. Tor as a whole is a complex system, and we do not pretend to understand every aspect of it. We are mostly just regular users, not Tor experts. In any case Tor's working principles are too complicated to be explained here, and besides others have already done that job well. To familiarize yourself with Tor, you should follow the links above.
Suffice it to say even though we did not show Tor among the main components of Untochat system, it is crucially important because it enables us to run our secure chat service anonymously. We will get back to that topic later in a dedicated section Offering sshd as Tor Onion Service.
The usefulness of Tor regarding Untochat is not limited to making Tor Onion Service possible. Untochat server also relies on Tor's client feature to hide Untochat server's IP address. Let us explain.
Our website kolttonen.fi hosts a Fedora Linux 28 custom package repository. The repository offers GPG-signed Untochat RPM packages for system administrators to install and update using Fedora Linux's stock dnf package manager. This poses a serious threat to Untochat server's anonymity. If dnf contacts kolttonen.fi to download RPM packages from there, then a network snooping man-in-the-middle or repository server's administrators could gain information about Untochat server's IP address. So direct connections to kolttonen.fi must never be allowed.
Fortunately there exists a simple but effective dnf plugin called python3-dnf-plugin-torproxy. It solves our problem by forwarding all dnf connections to destination host 127.0.0.1 (localhost) port 9050 where tor SOCKS proxy is listening. Tor daemon tor then routes the dnf connection to kolttonen.fi via the anonymizing Tor network. This proxying hides Untochat server's IP address from outside observers and kolttonen.fi admins cannot know the source IP address either.
Sadly python3-dnf-plugin-torproxy package in Fedora Linux 28 is not safe by default. So we have configured python3-dnf-plugin-torproxy to be in the strict mode, meaning that all connections made by dnf must always be routed to Tor Network. In case of Tor failures, dnf must not fallback to making a direct connection to kolttonen.fi.
This program is often used by many Linux administrators. It controls Linux kernel's networking firewall rules. We have decided to remove Fedora Linux's default program firewalld and use iptables instead. We know practically nothing about firewalld. Being very paranoid and not knowing that much about networking details, we have made it our default iptables policy to drop all packets. This applies to predefined chains:
INPUTOUTPUTFORWARDSo all network traffic must be explicitly allowed, or otherwise it is dropped (i.e. silently discarded and thus denied).
Using iptables, we have tried our best to limit Untochat server as much as possible. This description is probably not totally exhaustive, but here are some key points:
tor to use only those ports by using ReachableAddresses configuration option. So if you use iptables to open more ports for Tor, you must also add those ports to /etc/torrc.untochat or else tor does not use them. Main configuration is /etc/tor/torrc and it sources our definitions from /etc/torrc.untochat.owner module, we allow only Linux user toranon to use the outgoing Tor ports mentioned above. Other processes cannot use them as long as toranon user runs only Tor and nothing else.owner module, we deny Linux group untochat members all outgoing connections except to 127.0.0.1 TCP port 6667 (that is where ngircdus listens for incoming IRC connections from irssius).owner module, we allow only Tor to connect to sshd, matching Linux user tornanon.owner module, we allow only chronyd access to outgoing UDP port 123, matching Linux user chrony. This access is required because chronyd must keep operating system's time correct. It needs access to external NTP servers to do that. If system time drifts too much, Tor will not work.ping and we want our networking to function properly. If you know better, you can remove this rule and replace it with something more limiting.In addition we have created a custom chain called LOGDROP. For extra anonymity, we scan all outgoing DNS queries for packet content, trying to find string "kolttonen.fi" or string "sange.fi". Matching is case insensitive and it is done using hex-string module. If a match is found, then the matching packet is logged and dropped. This is admittedly bit of a hack, but we want to make sure that Untochat server will never be associated with kolttonen.fi in any way. That is why we have chosen to inspect the DNS queries.
Further, we have added a strict rule to drop all packets destined to kolttonen.fi.
We have identified one pretty surprising DNS-related risk factor that could be detrimental to Untochat server's anonymity. We have blocked access to kolttonen.fi using bare IP address in /etc/sysconfig/iptables. Now suppose that Untochat server admin wants to see which rules are effective. He or she could issue a command such as:
That would cause reverse DNS lookups to display human readable hostnames. But we do not
want that precisely because we have listed 83.143.220.141 as a denied destination host, to avoid being associated with kolttonen.fi. So reverse DNS queries are also scanned for content and dropped when needed.
Note that ip6tables service is also configured and enabled by default. Because our IPv6 firewall rules are almost totally identical compared to the IPv4 version, we do not discuss them separately here. The IPv6 related rules are in /etc/sysconfig/ip6tables.
This section briefly describes the PAM modules that are relevant to Untochat. PAM stands for "Pluggable Authentication Modules". It is a framework originally developed by Sun Microsystems. Fedora Linux uses an implementation called Linux PAM. There exists an alternative named OpenPAM.
The basic idea of PAM is that applications no longer include detailed authentication and authorization functionality in their own source code. Instead the applications make themselves PAM-aware. When authentication is needed, the applications make PAM API calls to use PAM library. The applications need not know how PAM library does the authentication. In addition to authentication, PAM modules often perform other tasks associated with user sessions.
PAM configurations can be very flexible. PAM library supports stacked modules, meaning that a single PAM API call made by an application can invoke many different PAM modules. It is sometimes system administrator's task to configure PAM authentication, but often stock configurations work fine without intervention.
We have edited /etc/security/limits.conf to configure pam_limits.so:
untochat is allowed a maximum of three simultaneous processes. This is a hard limit that cannot be exceeded even temporarily. Kernel enforces the limit. We thus allow Untochat users to run one of these process sets:sshd + untosh + irssiussshd + untosh + passwduntochat is allowed only one login session at a time. Earlier we described how untosh restricted shell also limits sessions to one by using an exclusive lockfile $HOME/untosh_lockfile. This PAM-based limitation is checked first, so untosh check exists just to be sure.We already explained before that sshd uses PAM to consult pam_selinux.so. This module finds out a correct mapping between a Linux user and a SELinux user. It also sets the execution context using setexeccon() SELinux library function. So pam_selinux.so is very important to us. Fedora Linux 28 stock configuration works well, so there was no need to adjust anything.
We struggled for a long time with pam_systemd.so. We tried to figure out what this module does and arrived at a conclusion that it is not essential for Untochat. It ships with systemd, not Linux-PAM. We compared SSH login sessions done with unconfined_u, guest_u and untochat_u. Of those three, unconfined_u session successfully ran pam_systemd.so. As a result additional programs such as pulseaudio were started. We believe systemd also called fork() once or twice to create child processes to monitor the login session, but we do not remember for sure.
Using guest_u and untochat_u pam_systemd.so module failed, because these SELinux users enter restricted domains guest_t and untochat_t. For example, pam_systemd.so functionality requires DBUS-communication rights and numerous other rights, too. We went through the frustration of adding allow rules one by one, and got pam_systemd.so to run successfully using untochat_u. We also read pam_systemd.so's C code.
But that exercise showed us only that we do not want to grant all those extra rights to untochat_t security domain. Restricting the maximum number of simultaneous processes to three seems like a good and simple goal. Having pam_systemd.so execute successfully would mean unnecessary extra processes and too many unneeded privileges.
As a sidenote, Fedora Linux's guest_u also fails to run pam_systemd.so successfully and that SELinux user was created by SELinux experts. So we believe our untochat_u does not need pam_systemd.so either. This PAM module is defined as optional for session in /etc/pam.d/system-auth, so we let it be optional. It fails, but we do not care.
Like we mentioned in the sshd section, we have disabled showing information about successful and failed logins. The rationale is not to reveal Untochat server's timezone. We want to remain as anonymous as possible. Removing showing failed login information must be done by editing /etc/auth/postlogin to control pam_lastlog.so's behaviour. Fedora Linux's default setting is not acceptable to us. To be more specific, the line:
has been cleared of showfailed argument.
Linux kernel has a feature called namespaces. It is also related to security, because it can provide isolation of operating system resources. For example, filesystem view and process table view can be limited using it. Systems like Docker make use of that kernel feature.
Despite the name, pam_namespace.so has nothing to do with Linux kernel namespaces. This PAM module provides polyinstantiated directories using a Linux feature called bind mounts. In short, its relevance to Untochat is that sshd PAM stack includes a call to pam_namespace.so. If the module is activated using settings in /etc/security/namespaces.conf, it will enable the polyinstatiated directories for users that the administrator can select.
"Polyinstantiation" is basically just a fancy name for a feature that is pretty easy to understand. In our case directory /tmp is polyinstantiated. What this means is that when a user logs in, we provide him or her a dedicated, unique instance of that directory. Normally /tmp is shared between all users, i.e. they see and access the same directory.
Using polyinstantiation we isolate users so that they will still see the name /tmp in the filesystem. However, pam_namespace.so has hidden the real directory using bind mounts, so the users see and access their private versions only. For example, when a user process writes its temporary data to /tmp, the bind mount transparently redirects the write operation to the private version. Applications and users are not aware of this redirection, they use /tmp like usual, so everything works as expected.
Polyinstantiation can improve overall system security, privacy and anonymity, because sometimes /tmp may contain somewhat sensitive information that really should not be there.
We use block device (i.e. disk, USB stick, etc.) encryption based on the LUKS standard, as offered by Fedora Linux installer program Anaconda. LUKS is an abbreviation of "Linux Unified Key Setup".
Our custom kickstart file for installing Fedora Linux 28 automatically encrypts the installation disk's partitions. In our test environment, the setup looks like this:
Note that the /boot partition is not encrypted, though.
We are not sure that the discards flag is good for safety, but Fedora Linux 28 installer used it. Some sources claim that it could have negative consequences that are not very significant. We assume that discards is enabled for performance reasons on SSD devices.
Some cryptography experts say that it improves security if you fill the block device with random data before enabling disk encryption. We are not crypto experts, but intuitively it seems to make sense that having a disk filled with random bytes is a better starting point than having predictable data lying around. So the very first thing that our kickstart file does in its %pre section is:
That wipes the whole /dev/sda block device content replacing it with random data just like the experts suggest.
Unfortunately obtaining several gigabytes worth of good-quality random data from kernel's pseudo-device /dev/urandom is quite slow. In our test environment, it takes several minutes with QEMU's file-based virtual disk, the size of which is 10GB. Further, all the data needs to be written on disk. Waiting for the installer is admittedly boring, but the slow method should reward us with stronger security.
Using block device encryption means that all Untochat programs, settings and data are stored encrypted. Early in the Fedora Linux operating system startup phase, correct passphrase is required in order to decrypt and mount the encrypted file systems. Without the correct passphrase, the file systems remain encrypted and inaccessible. That is absolutely great for security, but not so great if you are the administrator and cannot remember the passphrase.
On top of the LUKS encrypted partitions, our kickstart file creates XFS file systems. XFS was created by Silicon Graphics in 1993 and was first used on their legendary SGI UNIX machines. Later it was ported to Linux. In our opinion, it is a very good file system.
We have compiled untosh, irssius and ngircdus with the most secure compiler and linker options that we know of. Debian GNU/Linux has published a good hardening page. We found a very useful hardening-check tool from there. It can be used to inspect ELF binaries from a security point of view.
We used gcc version 8.1.1 to compile and link. We have enabled:
D_FORTIFY_SOURCE=2. Debian GNU/Linux security experts explain the meaning in the following way:
So it is now pretty clear, but you may be wondering what is the meaning of %n format specifier and what is the potential danger associated with it. On Fedora Linux 28, manual page for printf(3) library function provides an example:
printf(foo); often indicates a bug, since foo may contain a % character. If foo comes from untrusted user input, it may contain %n, causing the printf() call to write to memory and creating a security hole.In other words, %n instructs printf() to "print" into memory, writing data there. It is not good at all if the input is not trusted.
Here is a sample output of hardening-check in our test environment:
It is now time to look at the detailed Untochat overview diagram. We hope this will make things clearer. For simplicity, iptables is not shown here.
Now that you understand the basic components of Untochat, we can try to build the secure chat infrastructure and test that it works. This tutorial assumes that you will use Fedora Linux 28 on a QEMU virtual machine. However, other virtual machines such as VirtualBox will work, too. Or if you want to dedicate real hardware for running Untochat, it will be fine. We suggest using virtual machines just because that way you can trust us more. Even if our code was malicious, it would be confined inside your virtual machine and not be able to harm your host machine.
Untochat is based on a stock Fedora Linux 28, with some SELinux policy modules added and userspace programs modified. There is also the restricted shell. No more, no less. It is still very likely that this system as a whole contains security bugs. Regarding Untochat's part in this OS, we believe its restricted chat users are pretty well confined. If Untochat contains security flaws, they are not intentional and we would like to hear about them so that fixes could be applied and released.
We have tried to make everything as smooth as possible for Untochat administrators. However, running Linux servers always requires some experience. We have worked hard to make this system both secure and anonymous, but modern operating systems are huge and complicated. To reiterate: that leaves room for unknown security bugs. Thus we make no guarantees about this system. You use Untochat at your own risk.
Even if the OS and applications were assumed to be perfect, it is unfortunately quite possible that the underlying hardware is not reliable. There is not much we can do about it.
It is also clear that if you want to run Untochat and be safe, you must avoid the so-called commercial "cloud platforms". They provide virtualized guest environments for paying users. Those environments are far from safe, because they allow access to the administrators who operate the underlying host environments. Remember the saying: "There is no cloud, there is only other people's computers!". There really is no cloud.
Let's get started with the installation and configuration. Use GNU Privacy Guard gpg to find Unto Sten's GPG public key. You need it to verify files. Issue command:
You should see a reply like the following. Type Q to quit.
Download and import Unto's public key:
Reply should be like:
WARNING! DO NOT INSTALL ANY PACKAGES THAT FAIL GPG SIGNATURE VERIFICATION!
You are now ready to verify our files.
In this section we will describe the host requirements for this Untochat experiment. For example, your host machine could be your laptop.
Your hardware must be powerful enough to run Fedora Linux 28 on a virtual machine.
The more RAM (Random Access Memory) you have, in general the better. If you have 2 gigabytes that can be allocated for QEMU virtual machine, it is probably enough.
We often call the virtual machine a guest from now on. This is to clearly separate it from the host when confusion is possible. By the way, we used Fedora Linux 28 both as a host and a guest.
It means simply that our laptop (which consists of real, tangible hardware) runs Fedora Linux 28. On top of that host OS our virtual machine (which is mainly a software construction) runs another, largely independent instance of Fedora Linux 28 as a guest operating system. This arrangement may seem weird if you are new to using virtual machines, but rest assured it is perfectly natural and causes no problems or contradictions. The host and guest operating systems are pretty well separated from each other.
It is also possible to run nested virtual machines where the host OS runs on a virtual machine too instead of real hardware. But let's forget about that and proceed further.
You also need a sufficiently modern CPU with its virtualization mode enabled. We suppose virtualization features are usually on by default. If they are not, they can be switched on by rebooting the host and tweaking the relevant BIOS settings.
Some old CPU models do not support virtualization at all. Using them is in theory possible if you let qemu run totally in software, but that is not recommended, because performance is likely to be unacceptably slow.
gpg software. You need GPG to verify our packages to make sure they are not modified by attackers.
You need <sten.unto@gmail.com> (KeyID: 4D26FE36) GPG public key imported into your GPG public keys ring. Without this key, package verification is impossible.
qemu software with KVM support available. QEMU without KVM support is very slow. In our opinion it is almost unusable. KVM provides hardware acceleration to qemu and like many people say, that makes QEMU and KVM a nice combination.
ansible software. Like we mentioned earlier in this article, ansible can be an extremely useful tool for system administrators and software developers alike. Ansible Playbooks can automate many boring, error-prone and repetitive tasks. We have created our custom Ansible Playbook to help with Untochat server configuration. Despite the two Ansible DNF bugs that we found, using Ansible has been a pleasure. This software really makes a huge difference. We believe it improves productivity and saves time.
Ansible is easy to use and requires almost no configuration. What is more, the target machines do not have any Ansible daemons or Ansible libraries installed. When you run ansible on the controlling machine (in our case the host machine), ansible uses SSH protocol to push all required libraries to the target machine. It puts them in temporary storage. It then logs in and runs all the tasks we have told it to run. Ansible Playbooks contain the task definitions. They are a bit like executable scripts in that sense.
When Ansible is done running tasks, it deletes the libraries and temporary files that it used during its run. In other words, the target machine is left in a clean state provided that the tasks did not do something crazy. Ansible cannot prevent you from ruining your target machine by giving wrong commands. Many times the tasks are run as superuser (i.e. root) so we must be extra careful.
In a nutshell, Ansible provides an automated way of doing system administration. Instead of manually typing in commands, we can write Ansible Playbooks and let ansible run the necessary commands for us. Ansible is also clever enough to inspect target machine's state so that it can avoid running tasks that are already done. This is a great feature and in many cases can make Ansible Playbooks much superior compared to shell scripts and hacks that administrators used to write.
ssh software. Ansible requires ssh client program on the host and sshd server program on the target machine. In our case, the Ansible target machine will be the guest virtual machine.
Our installer contains a controlling Makefile so make is needed.
Python 3 is also needed.
You need Apache httpd so that you can provide our kickstart file to Fedora Linux 28 installer. If you prefer to use another web server, it is of course all right.
In our QEMU+KVM test environment, we have allocated the following resources to the guest Fedora Linux 28:
It is very likely that the guest would run smoothly with less than that.
In this section we will install the Fedora Linux 28 guest.
First go to a suitable base directory for storing your QEMU guest virtual machine. It could well be your home directory. Then issue command:
Go kolttonen.fi/untochat/installer and download:
untochat-installer-fedora28-v1.tar.xz (installer package)untochat-installer-fedora28-v1.tar.xz.asc (detached GPG signature)Note that version number can be different in case we have updated the installer.
Make sure both files are in your qemu_untochat working directory and verify that Unto Sten's GPG signature is valid:
Expect to see a reply like this:
gpg: Signature made Sun 02 Sep 2018 05:58:43 PM EEST using RSA key ID 4D26FE36
gpg: Good signature from "Unto Sten <sten.unto@gmail.com>"
gpg: WARNING: This key is not certified with a trusted signature!
gpg:          There is no indication that the signature belongs to the owner.
Primary key fingerprint: 2714 E1D3 A852 54E8 7D93  8758 988E D990 4D26 FE36
You can ignore the "This key is not certified with a trusted signature!" warning. It means only that nobody has signed our key.
WARNING! IF THE SIGNATURE VERIFICATION FAILS, FIRST CHECK YOUR gpg --verify COMMAND. IT IS A COMMON MISTAKE TO GIVE THE FILENAMES IN A WRONG ORDER.
IF THE COMMAND IS CORRECT AND VERIFICATION STILL FAILS, DO NOT USE THE INSTALLER!
Unpack the installer and change your working directory:
We have automated the Fedora Linux 28 guest installation by creating a kickstart file. It is a simple text file that tells the Anaconda installer program how to do the installation. This means that you do not have to do any boring clicking in a GUI during the installation. It is a big advantage compared to manual installation. We have chosen a text-based installation and once it is started, it runs to completion by itself. In the end you just have to shutdown the virtual machine.
But before you can start the installation, you must customize your kickstart file by choosing:
ADMINUSER Choose a username that will have full sudo rights on your guest virtual machine.TIMEZONE See supported timezones using command:
KEYMAP See supported keymaps using command:
KICKSTARTFILE (your name for the kickstart file that will be created)ADMINUSER. Note that this same passphrase will also be used to encrypt disk partitions (/boot partition is not encrypted, though). It must be at least 12 characters. NOTE: We do not recommend using any special characters in the passphrase. When the passphrase is needed early in the OS boot process to decrypt disk partitions and mount them, the keymap will be US and cannot be changed. So entering special characters can be very difficult if you use an international keyboard.This command is what we use to get suitable settings for Finland:
Modify that command according to your preferences.
For clarity, here is another example. It selects timezone America/New_York and US keyboard and will create a customized kickstart file untochat.ks in your current working directory:
If both TIMEZONE and KEYMAP values are supported and KICKSTARTFILE does not already exist, you will be asked to enter your passphrase twice. If the passphrase is long enough and passphrases match, then your kickstart file will be created.
Unfortunately the customized kickstart file contains your passphrase unencrypted, in human readable plain text. This is because enabling the LUKS-based disk encryption with kickstart automation requires the passphrase to be initially given in plain text. You must change both disk encryption and login passwords when the guest virtual machine is up and running!
We will provide you with instructions later.
If you are an advanced user and need to do your own customizations, feel free to edit the kickstart file using your favourite text editor.
For instance, if you are just doing quick testing, you can remove the %pre section. It contains the very slow dd command. With that change you can avoid at least 10 minutes of waiting, but the disk encryption will be less secure.
This part of the installation may require some creative administration skills from you unless you use Fedora Linux. We use Fedora Linux 28 host, and Apache setup for our purposes is very easy:
Note that on Fedora Linux, it is important to provide the -Z option to the mv command above. That tells mv to set the destination file's SELinux security context to the default value of the destination. In our case, it made /var/www/html/fedora28.ks have context unconfined_u:object_r:httpd_sys_content_t:s0. The httpd_sys_content_t portion allows SELinux confined Apache to use the file.
After those commands, Apache is ready to serve fedora28.ks from its www root directory. This step is needed, because Fedora Linux 28 guest installer expects to download the kickstart file using HTTP protocol.
In case you need help figuring out your host's IP address, we have provided a helper script that uses curl to verify that your kickstart file is available from your web server. If you used a different name, replace fedora28.ks with your kickstart file's name and try this command:
If all goes well, you should see something like the following:
If you get errors, do your best to resolve them. Kickstart file must be available for the guest to download or the automated installation will not work.
Note that you cannot bind your Apache to your host's 127.0.0.1 and expect to serve the kickstart file using that IP address. This is because when you boot your guest virtual machine, it will see 127.0.0.1 as referring to its own loopback device. You need to use a "real" IP address that your host has so that your guest can contact the web server that is running on your host machine.
The important information we gained is this:
We have shown x.y.z.w and q.p.r.s instead of our IP addresses, but you should of course see proper IP addresses in the script output. Those lines are kernel parameters that you must give when booting the guest virtual machine. Save the information, because you will need it later.
Fedora-Workstation-netinst-x86_64-28-1.1.iso. The image size could be different, too, because Fedora Project sometimes updates their installers.Move the Fedora-Workstation-netinst-x86_64-28-1.1.iso into your qemu_untochat directory. We type:
First make sure that you are in your qemu_untochat directory. We type:
Create a virtual disk for the guest:
Boot the guest Fedora Linux 28 installer:
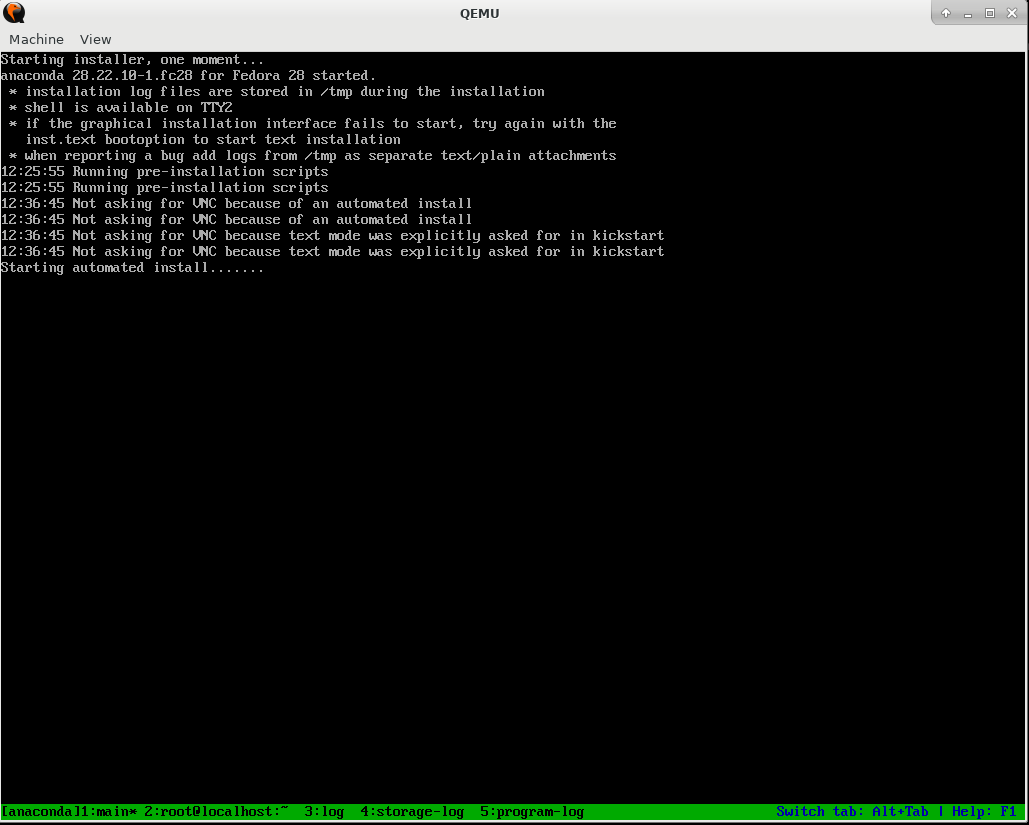
You should see Fedora Linux 28 installer starting.
inst.ks parameter. See our example below. Sadly this part can be very frustrating, because the keyboard layout is United States. Be patient and try to find the right keys.
If your inst.ks parameter was correct, Anaconda downloaded your kickstart file. You should see something like this:

As explained before, remember that in the %pre stage Anaconda runs the dd command getting random data from /dev/urandom. It fills /dev/sda block device with the random data. This process takes over 10 minutes in our test environment, so you just have to wait.
Then you should see the following:
Everything should go smoothly. Once you see this screen, follow the advice given and press ENTER to quit:

For some reason unmounting /run/install/repo failed, but it seems to make no difference. All is fine and our guest virtual machine is halted:

Use the QEMU GUI next. Go to Machine menu on top left corner. Choose Quit to quit QEMU.
The kickstart file pre-configured guest's sshd to listen on address IPADDR_ANY (i.e. 0.0.0.0). In practice this means that we can now access the guest using our host's ssh client. The guest must allow SSH access, because we will run ansible-playbook on our host to complete Untochat server's configuration and installation. Kickstart only installed the operating system and did some minor pre-configuration.
To use ssh, we must tell QEMU to forward host's 127.0.0.1 port 8888 to the guest's port 22. Port 22 is where sshd listens by default. Start QEMU with command:
You should see grub menu and Fedora Linux 28 boot should start. But because we have encrypted all important disk partitions apart from /boot, you need to enter your passphrase to unlock the partitions so that kernel can mount them. When you see a screen like this, enter the passphrase:

If the passphrase was correct, the boot process should continue. After a while you should see lightdm welcome screen, but do not login yet:

As you can see, kickstart successfully created an administrator account. In our case its login name is untosten and the passphrase is the same that was used for disk encryption.
NOTE: In the following sections, we will use our untosten admin account, but naturally you must use your own admin account. So always adjust your commands accordingly.
On your host machine, give the following command to login to the guest:
Because this is the first time your host's ssh contacts the guest, you should see something like this:
Answer yes. You should see:
Enter your passphrase and you should get in.
Now is the time to change your login passphrase!
So go ahead and type:
Then logout:
Now host's ssh knows the guest's identity and we can use Ansible to connect to the guest.
In this section we will configure and run Ansible to finalize Untochat installation on the guest. Now that we have the guest machine running, we must be extra careful so that we will always use the right machine. The following steps are done on the host machine.
For convenience, use your favourite text editor and add these lines to your ~/.ssh/config file.
We use vim again:
to enter lines:
Host fedora-test
	HostName 127.0.0.1
	Port 8888
	User untosten
After that make sure that the permissions are correct or ssh will not use the configuration file:
To test your configuration, try command:
Using your passphrase, you should be able to login to the guest, and once in, you should logout again.
With your favourite text editor, append these lines to /etc/ansible/hosts:
Change to untochat-installer-fedora28-v1 directory. We type:
Run Ansible tasks:
Enter your SSH passphrase and then watch how Ansible runs its tasks. You need patience, because the whole process can take several minutes to complete. Do not interrupt Ansible even if some task seems to hang.
If all goes well, in the end you should see no failures. Some of the Ansible tasks changed things, some of them exited with status ok. The ok status means simply that the guest was already in the state that Ansible wanted. For example, the kickstart installer already installed some software packages, but we want to make sure they are present using Ansible. It is possible that some advanced users have chosen a different set of programs to start with. Ansible tries to make sure that the guest OS satisfies all Untochat requirements.
You have already changed your Linux passphrase for ssh logins, but remember that kickstart installer file also contained the disk encryption passphrase in human readable plain text. Initially we used the same passphrase for both ssh login and disk encryption. But they can of course be different.
We must next login to the guest and change our LUKS encryption passphrase. On host, type the familiar command:
You should get in. On guest, type:
In our test environment, we see this:
NAME                                          MAJ:MIN RM  SIZE RO TYPE  MOUNTPOINT
sda                                             8:0    0   10G  0 disk
├─sda1                                          8:1    0    1G  0 part  /boot
├─sda2                                          8:2    0    1G  0 part
│ └─luks-53a0efe6-bd60-49db-b12d-2a257b609ba1 253:0    0 1022M  0 crypt [SWAP]
└─sda3                                          8:3    0    8G  0 part
  └─luks-2bb8a0f2-f6f4-49c1-a2a8-d91098291931 253:1    0    8G  0 crypt /
sr0                                            11:0    1 1024M  0 rom
Notice that two partitions have LUKS containers marked by TYPE crypt. They are swap and root partitions that kickstart file's autopart command created during the guest OS installation phase. Next type:
We see this:
luks-2bb8a0f2-f6f4-49c1-a2a8-d91098291931 UUID=2bb8a0f2-f6f4-49c1-a2a8-d91098291931 none discard
luks-53a0efe6-bd60-49db-b12d-2a257b609ba1 UUID=53a0efe6-bd60-49db-b12d-2a257b609ba1 none discard
LUKS identifiers match, those are the same containers that lsblk showed us.
To help you with Untochat administration tasks, we have created untochat-admin-tools RPM package. Ansible tasks just installed it for you. To see the RPM contents, type:
We see:
/opt/sbin/untochat-add-admin
/opt/sbin/untochat-add-passphrase-to-luks-disks
/opt/sbin/untochat-add-user
/opt/sbin/untochat-kill-system
/opt/sbin/untochat-remove-passphrase-from-luks-disks
/opt/sbin/untochat-remove-user
We will use two of those tools in the next phases.
In order to change the LUKS passphrase, we have the following plan:
Let's do that next.
Type:
You will see that it does not quite work, but untochat-add-passphrase-to-luks-disks is helpful and tells us the correct way to run this tool:
untochat-add-passphrase-to-luks-disks usage: untochat-add-passphrase-to-luks-disks [passphrasefile]

[passphrasefile] must have exactly three lines and the content must be:
your_old_passphrase
your_new_passphrase
your_new_passphrase
Use your favourite text editor to create the passphrasefile. Just make sure you do not create it inside your /boot partition, because that partition is not encrypted. We recommend creating it under /root directory. We type:
to create a file where the first line contains our current LUKS passphrase, and the next two lines contain the new passphrase that we want to add. So the new passphrase must entered twice the same way. It is standard procedure to make sure this passphrase is what you really want to use.
After we have created our file, we type:
In our test environment, we see:
Adding new passphrase to /dev/disk/by-uuid/2bb8a0f2-f6f4-49c1-a2a8-d91098291931 SUCCESS
Adding new passphrase to /dev/disk/by-uuid/53a0efe6-bd60-49db-b12d-2a257b609ba1 SUCCESS
If you get errors, check your passphrasefile and try again.
passphrasefile!
So we type:
If you want more information, you can verify the LUKS headers to make sure another passphrase was added. To do that, use the disk UUID identifiers that untochat-add-passphrase-to-luks-disks showed earlier. For example, we type:
We then observe that Key Slot 0 and Key Slot 1 are both ENABLED, so we know two passphrases are stored inside that LUKS header. Both can be used to unlock the encrypted partition. The remaining six key slots are shown as DISABLED, because they have no keys.
LUKS header information for /dev/disk/by-uuid/2bb8a0f2-f6f4-49c1-a2a8-d91098291931

Version:       	1
Cipher name:   	aes
Cipher mode:   	xts-plain64
Hash spec:     	sha256
Payload offset:	4096
MK bits:       	512
MK digest:     	f7 3e 37 b9 64 f9 32 8e be 15 55 a7 42 6a 31 e8 71 64 3a 72
MK salt:       	07 de 38 c7 0c 7e 15 34 dc 79 d3 4d cc cb e7 ca
               	e7 e8 6a 2f 43 b3 94 10 ee 9d 13 99 2d 11 62 ad
MK iterations: 	57588
UUID:          	2bb8a0f2-f6f4-49c1-a2a8-d91098291931

Key Slot 0: ENABLED
	Iterations:         	921420
	Salt:               	70 b3 23 24 56 23 c4 5e 98 fd cb 59 71 c3 0b a6
	                      	d0 3b e0 a0 43 16 74 fe 20 5c bb 05 d0 90 cf 11
	Key material offset:	8
	AF stripes:            	4000
Key Slot 1: ENABLED
	Iterations:         	924670
	Salt:               	c5 c5 90 9a 1b 0c 41 61 80 a4 e2 01 d8 09 0f a3
	                      	d5 cd 8c 65 48 49 95 d6 80 e8 17 b8 93 ab a8 0d
	Key material offset:	512
	AF stripes:            	4000
Key Slot 2: DISABLED
Key Slot 3: DISABLED
Key Slot 4: DISABLED
Key Slot 5: DISABLED
Key Slot 6: DISABLED
Key Slot 7: DISABLED
Before you reboot your guest virtual machine, we have to warn you about one thing. The command make run_ansible that you ran earlier performed dozens of different tasks on the guest machine. Those tasks consist mainly of software installation and doing various configuration changes both to the applications and to the OS.
Among those configuration tasks was creating new networking firewall rules for iptables. Ansible uploaded the new rules to the guest and enabled iptables-service to be started automatically by systemd during the next guest OS boot. But Ansible did not reload the firewall rules automatically. The reason for that is simple: the new firewall rules are quite restrictive and once effective, they will block all incoming ssh connections.
You may remember that Ansible's communication channel from the controlling host to the guest is precisely SSH protocol using standard port 22 on the guest. That is why we deferred reloading the firewall rules. Otherwise Ansible connection would have been left hanging before finally expiring.
After you have rebooted your guest virtual machine, you must use QEMU and lightdm graphical login screen to access your guest.
To reboot the guest, type:
The guest will reboot. When you see a screen like this, enter your new LUKS passphrase to unlock disk encryption:
If you cannot proceed using your new passphrase, you can use the old one. But we assume that the new passphrase will work and move on to the next phase.
Our lightdm graphical login screen looks like this again:
Once logged in, you will see a fantastic Xfce desktop environment with the default theme pre-selected for you. This GUI system really saves your sanity on Linux desktop, and we recommend it to all who want a simple and effective desktop. It is possible to configure Xfce to work in the way you prefer and that is the way it should be. Unfortunately too many Linux desktops are more like prisons, they force their defaults on users and they are quite horrible to live with.
Near the top right corner of the screen, you have access to four virtual workspaces or virtual desktops in case you like to use them:

Our preference is to usually have at least ten virtual desktops on Xfce, split in 2x5 formation. Test environments are an exception, in those we can settle with the default four. Using CTRL + ALT + [ARROW KEY], it is possible to switch between virtual desktops quickly.
To run bash, open a terminal by clicking on the black terminal icon on the bottom of the screen.
WARNING! The following practice is not recommended, but we do it, because we trust our host machine and cannot stand the small QEMU terminal window.
We temporarily stop iptables so that we can access the guest again from our host, using a bigger terminal window and ssh:

On host machine, we type:
We can get in again because our firewall is temporarily down.
Knowing that the new LUKS passphrase works, we want to complete our mission and remove the old LUKS passphrase. To do so, we type:
But we get the response:
untochat-remove-passphrase-from-luks-disks usage: untochat-remove-passphrase-from-luks-disks [passphrasefile]

[passphrasefile] must have exactly one line and the content must be:
your_passphrase_that_you_want_to_remove
As you can see, the command did not run successfully, but it gave us a hint to use it correctly. So we need to create a passphrasefile again. This time the file must have exactly one line and that line must contain our old passphrase so that the tool knows which one to remove.
We type:
Once the file is created, we type:
This time we see that it worked:
Removing passphrase from /dev/disk/by-uuid/2bb8a0f2-f6f4-49c1-a2a8-d91098291931 SUCCESS
Removing passphrase from /dev/disk/by-uuid/53a0efe6-bd60-49db-b12d-2a257b609ba1 SUCCESS
Even though our old passphrase is now disabled, it is good to remove the passphrasefile that we just created:
If you want to verify that the old passphrase is gone, you can use cryptsetup again. For example, in our test environment we issue command:
The important thing to notice here is that Key Slot 0 shows state DISABLED. That slot contained our initial, old LUKS passphrase. It is no longer there, just like we wanted. Key Slot 1 is ENABLED and it contains our new LUKS passphrase. The remaining key slots are empty, so we know that only our new passphrase is currently valid:
LUKS header information for /dev/disk/by-uuid/2bb8a0f2-f6f4-49c1-a2a8-d91098291931

Version:       	1
Cipher name:   	aes
Cipher mode:   	xts-plain64
Hash spec:     	sha256
Payload offset:	4096
MK bits:       	512
MK digest:     	f7 3e 37 b9 64 f9 32 8e be 15 55 a7 42 6a 31 e8 71 64 3a 72
MK salt:       	07 de 38 c7 0c 7e 15 34 dc 79 d3 4d cc cb e7 ca
               	e7 e8 6a 2f 43 b3 94 10 ee 9d 13 99 2d 11 62 ad
MK iterations: 	57588
UUID:          	2bb8a0f2-f6f4-49c1-a2a8-d91098291931

Key Slot 0: DISABLED
Key Slot 1: ENABLED
	Iterations:         	924670
	Salt:               	c5 c5 90 9a 1b 0c 41 61 80 a4 e2 01 d8 09 0f a3
	                      	d5 cd 8c 65 48 49 95 d6 80 e8 17 b8 93 ab a8 0d
	Key material offset:	512
	AF stripes:            	4000
Key Slot 2: DISABLED
Key Slot 3: DISABLED
Key Slot 4: DISABLED
Key Slot 5: DISABLED
Key Slot 6: DISABLED
Key Slot 7: DISABLED
If you accidentally remove the last remaining passphrase from a LUKS container, then the container has only disabled key slots left. That means you can no longer decrypt the container and unlock it for remounting during the next OS boot. In other words, you are screwed. The data will remain inaccessible forever, no matter what you do.
To prevent that from happening, untochat-remove-passphrase-from-luks-disks first verifies that all LUKS containers have at least two passphrases left. If that check fails, then nothing is done and untochat-remove-passphrase-from-luks-disks will exit notifying you of the dangerous situation.
If you ever forget your LUKS password and have made no backup safety arrangements, you are also screwed. LUKS uses strong encryption that is currently believed to be unbreakable.
In this section we will give you advice for Untochat administration. In general, we recommend that you do not customize parts that are visible to users. We mean for example ngircdus MOTD file /opt/etc/ngircdus.motd and irssius settings in /opt/etc/irssius.conf. What is the reasoning behind our recommendation? Just think of the recommendations given by Tor Project and Tails security experts. They recommend that their customized, Tor-enabled special version of Firefox is left alone as much as possible.
Using Tails, we think we even got warnings when we changed the size of the Firefox browser window. Sometimes even small, innocent-looking things can be significant to anonymity and security! It is good for anonymity to be part of bigger masses. If you customize the overall look of your Untochat server, it will stand out from the rest. It is much better to stick with the defaults whenever you can, because then all Untochat servers will look the same. That makes it harder for infiltrators to identify them.
Almost all Untochat-specific system-wide files are installed under /opt. Those include executable programs, configuration files and manual pages. However, there are two exceptions:
/usr/lib/tmpfiles.d/ngircdus.conf/usr/lib/systemd/system/ngircdus.serviceThe first file tells systemd the location of run-time temporary files for ngircdus IRC daemon. The second is systemd Unit file. It tells systemd how to start and stop ngircdus, among other things.
Putting those files under /opt would not have made much sense, because the locations under /usr are standard for systemd. For example, systemd uses symbolic links, and expects its Unit files to be in their standard locations.
On its first startup, irssius creates /home/$USER/.irssius directory and creates a personalized configuration file /home/$USER/.irssius/config for the user. When doing this, irssius copies basic settings from /opt/etc/irssius.conf. The customized file is not that different compared to /opt/etc/irssius.conf, but it contains user's IRC nickname and username. It also contains "Real Name" as taken from /etc/passwd. It is of course good to never use any real "Real Names" at all when creating users. When "Real Name" field is not present in /etc/passwd, irssius uses its own default value "Unknown". If you want to use "Real Names" to help you identify your Untochat users, use fake names that cannot reveal the true identities of users.
To check that SELinux status is good, we can type:
In our test environment we see:
SELinux status:                 enabled
SELinuxfs mount:                /sys/fs/selinux
SELinux root directory:         /etc/selinux
Loaded policy name:             targeted
Current mode:                   enforcing
Mode from config file:          enforcing
Policy MLS status:              enabled
Policy deny_unknown status:     allowed
Memory protection checking:     actual (secure)
Max kernel policy version:      31

Process contexts:
Current context:                unconfined_u:unconfined_r:unconfined_t:s0-s0:c0.c1023
Init context:                   system_u:system_r:init_t:s0
/usr/sbin/sshd                  system_u:system_r:sshd_t:s0-s0:c0.c1023
/opt/sbin/ngircdus              system_u:system_r:ngircdus_t:s0

File contexts:
Controlling terminal:           unconfined_u:object_r:user_devpts_t:s0
/etc/passwd                     system_u:object_r:passwd_file_t:s0
/etc/shadow                     system_u:object_r:shadow_t:s0
/bin/bash                       system_u:object_r:shell_exec_t:s0
/bin/login                      system_u:object_r:login_exec_t:s0
/bin/sh                         system_u:object_r:bin_t:s0 -> system_u:object_r:shell_exec_t:s0
/sbin/agetty                    system_u:object_r:getty_exec_t:s0
/sbin/init                      system_u:object_r:bin_t:s0 -> system_u:object_r:init_exec_t:s0
/usr/sbin/sshd                  system_u:object_r:sshd_exec_t:s0
/opt/etc/ngircdus.conf          system_u:object_r:ngircdus_conf_t:s0
/opt/etc/ngircdus.motd          system_u:object_r:ngircdus_conf_t:s0
/opt/etc/irssius.conf           system_u:object_r:irssius_conf_t:s0
/opt/bin/untosh                 system_u:object_r:untosh_exec_t:s0
/opt/bin/irssius                system_u:object_r:irssius_exec_t:s0
/opt/sbin/ngircdus              system_u:object_r:ngircdus_exec_t:s0
The directory /opt/sbin contains some admin tools that help you to manage Untochat.
To create a new Untochat user, type:
To set password for the Untochat user:
After those commands username is able to login, change his or her password, and use irssius to chat.
We have chosen not to force changing password on users' first login, so it is users' responsibility to change their passwords.
But for example if we want to force our user silver to change his password on next login, we type:
We should get the following response:
Expiring password for user silver.
passwd: Success
When silver logs in next time, his SSH session's beginning will look like this:
You are required to change your password immediately (administrator enforced)
WARNING: Your password has expired.
You must change your password now and login again!
Changing password for user silver.
Current password:
For security reasons it can be very wise to force the password change on first login.
To remove Untochat user, simply type:
This command uses signal SIGKILL to forcibly terminate all user's running processes if there are any. Then it removes the user from the system, including his or her home directory.
If you need to add admins to Untochat, you can use:
Be very careful about adding admins, because admins are trusted and can do anything in Untochat. Only regular Untochat users are restricted. It would be a total disaster to grant Untochat admin rights to a snooping infiltrator! You trust yourself, but who else do you want to trust?
In serious emergency situations you will want to get rid of your Untochat server. We hope you will never get in that kind of situation, but you never know. So we have created a special tool to quickly make the LUKS encrypted storage volumes inaccessible. It works simply by overwriting the LUKS headers with random data, multiple times. After making sure that the destruction is done, it will poweroff the running OS. Once that is done, nobody can access the LUKS containers any more. The data is gone and you can remove the disk image from host by using familiar rm command.
cryptsetup FAQ tells us the following:
5.4 How do I securely erase a LUKS (or other) partition?
For LUKS, if you are in a desperate hurry, overwrite the LUKS header and key-slot area. This means overwriting the first (keyslots x stripes x keysize) + offset bytes. For the default parameters, this is the 1'052'672 bytes, i.e. 1MiB + 4096 of the LUKS partition. For 512 bit key length (e.g. for aes-xts-plain with 512 bit key) this is 2MiB. (The different offset stems from differences in the sector alignment of the key-slots.) If in doubt, just be generous and overwrite the first 10MB or so, it will likely still be fast enough. A single overwrite with zeros should be enough. If you anticipate being in a desperate hurry, prepare the command beforehand. [ … ]
We followed that piece of advice: a self-destruction command has been prepared for you. To kill your Untochat system, you can type:
Because this command makes the system inaccessible forever, it will ask twice for confirmation.
Just for demonstration purposes, we answered y to both confirmation questions, so our Untochat server was soon dead. This is what it looked like in our test environment:
WARNING!!! You are about to kill Untochat permanently!
Are you sure? (y/n) y
I am ready to kill Untochat but I will ask one more time:
Do you REALLY want to do this? (y/n) y
Killing Untochat, please wait...

I will overwrite the first 10 megabytes of each LUKS device 5 times.

Round 1
Overwriting /dev/disk/by-uuid/f6208942-d2ff-4583-80a0-d4599badb310 SUCCESS
Overwriting /dev/disk/by-uuid/23eb090d-2cd9-4c58-ae51-705daaae6a10 SUCCESS

Round 2
Overwriting /dev/disk/by-uuid/f6208942-d2ff-4583-80a0-d4599badb310 SUCCESS
Overwriting /dev/disk/by-uuid/23eb090d-2cd9-4c58-ae51-705daaae6a10 SUCCESS

Round 3
Overwriting /dev/disk/by-uuid/f6208942-d2ff-4583-80a0-d4599badb310 SUCCESS
Overwriting /dev/disk/by-uuid/23eb090d-2cd9-4c58-ae51-705daaae6a10 SUCCESS

Round 4
Overwriting /dev/disk/by-uuid/f6208942-d2ff-4583-80a0-d4599badb310 SUCCESS
Overwriting /dev/disk/by-uuid/23eb090d-2cd9-4c58-ae51-705daaae6a10 SUCCESS

Round 5
Overwriting /dev/disk/by-uuid/f6208942-d2ff-4583-80a0-d4599badb310 SUCCESS
Overwriting /dev/disk/by-uuid/23eb090d-2cd9-4c58-ae51-705daaae6a10 SUCCESS
Overwriting LUKS headers is done using dd and random data from /dev/urandom, with conv=sync enabled. This means that dd will not exit until it has told Linux kernel to sync its buffers to disks. But to be sure that the data is written to disk, after overwriting this tool calls sync ten times. It then sleeps for 60 seconds to give kernel plenty of time to complete its job.
Finally untochat-kill-system calls:
to kill the machine.
The command above does not have a typo in it. We really want the option --force twice so that the killing will be quick, nasty and unconditional. According to systemctl manual page:
If --force is specified twice for these operations (with the exception of kexec), they will be executed immediately, without terminating any processes or unmounting any file systems. Warning: specifying --force twice with any of these operations might result in data loss. Note that when --force is specified twice the selected operation is executed by systemctl itself, and the system manager is not contacted. This means the command should succeed even when the system manager has crashed.
Like the name suggests, this command adds a new passphrase to LUKS encrypted volumes. The correct usage was already demonstrated in the section Adding new LUKS passphrase.
This command also has a descriptive name. It removes old passphrase from LUKS encrypted volumes. The correct usage was already demonstrated in a previous section.
Running irssius will not work for Untochat administrators, because irssius is very restricted. For that reason, you should probably install regular irssi IRC client program so that you can perform operations that irssius does not allow. Having both irssi and irssius installed causes no problems, because they use different configuration files.
To install irssi, just issue command:
sudo dnf -y install irssi
To connect to ngircdus, type:
irssi -c 127.0.0.1 -p 6667
After that /OPER command should work if you need IRC Operator privileges.
Those who wish to examine the inner workings of Untochat in greater detail need access to the source code.
We release all our Untochat-specific components under the well-known GNU General Public License. If you are unfamiliar with the term "free software", see Richard Stallman's The Free Software Definition. The source code is available as source RPMs. For example, to download ngircdus source RPM, you could issue the following commands:
Or if you wish to download source RPMs without installing Untochat first, you can access the source RPM repository directly. In that case verify the source RPMs manually. For example:
You should get a reply like this:
ngircdus-24-38us.fc28.src.rpm: digests signatures OK
We already mentioned in the previous section python3-dnf-plugin-torproxy that in Untochat system dnf package manager uses Tor to anonymously fetch GPG-signed RPM packages from kolttonen.fi RPM package repository. Tor proxying is necessary in order to prevent anybody from knowing that our server possibly runs Untochat. But the main purpose of Tor in our system is to offer SSH login service (sshd) as Tor Onion Service. Previously services like that were known as "Hidden Services" in Tor jargon.
In the iptables section we mentioned the ports that we have opened. You may have noticed that our firewall configuration is very strict. Notably it allows no incoming TCP connections at all. So how can Tor Onion Service offer access to our sshd for chat users to login using their "torified" SSH clients? Making connections to a closed system seems impossible.
The explanation is simple in its broad outline, but it may feel pretty counter-intuitive at first if you are used to running ordinary Unix/Linux servers. Unlike traditional TCP services such as normal SSH, Tor Onion Services do not need any public listening TCP sockets.
On the contrary, for security and anonymity reasons, we must make sure that our sshd listens only on 127.0.0.1 (localhost). When tor daemon creates our Tor Onion Service, it makes an outbound connection to Tor Network. It runs as a client. Using Tor magic and a special rendezvous point in Tor network, Tor network registers our Tor Onion Service and makes it known and accessible to Tor users.
This Tor service model is absolutely fantastic for ordinary citizens, because it allows us to run our Tor Onion Services even if our computers are behind strict firewalls and behind NAT. All we need is working outbound connections to Tor network. It is also very easy for us to configure Tor Onion Services. Unless access to Tor network has been blocked, we can run Tor Onion Services from our homes without big problems.
You should be logged in to your guest machine now. Note that you cannot do this using ssh from the host, because we need to enable iptables and bind sshd to 127.0.0.1. Use the QEMU and LightDM graphical login to get in.
First make sure that iptables is started with:
On Fedora Linux 28, tor daemon is SELinux restricted by default. It runs in tor_t security domain. SELinux boolean tor_can_onion_services must be enabled so that Tor Onion Services can be created. During the Ansible playbook installation phase, tor_can_onion_services was automatically turned on.
To verify the boolean status, you can type:
You should see a reply like this:
tor_can_onion_services --> on
In our case we just basically have to tell tor daemon that it should offer access to 127.0.0.1 port 22 (where our sshd listens, it is using system's internal loopback network device lo). So from a system administrator's point of view, it is a simple matter of altering a few lines in the tor configuration file.
Why is it important that sshd is bound only to 127.0.0.1? To hide our Untochat server's identity. If you make sshd listen to a public network interface, you run the risk of being identified. Suppose an infiltrator has gained SSH access to your Untochat by finding out someone's password in some way. If he or she then suspects that your public IP might contain your instance of sshd Tor Onion Service, he or she could simply connect to your public IP address port 22 and login with the credentials he or she knows. If he or she gets in, it is practically certain that your IP just leaked out.
This same principle applies to any Tor Onion Service that needs to remain anonymous. For example, if you decide to run your personal web server as Tor Onion Service, then your web server must never listen on public network interfaces.
Let's edit sshd_config right away, before enabling our Tor Onion Service. We type:
We then find the potentially dangerous setting:
ListenAddress 0.0.0.0
and edit it to be:
ListenAddress 127.0.0.1
After that we must remember to restart sshd with:
Ansible playbook run installed file /etc/tor/torrc.untochat for us. The main configuration file /etc/tor/torrc has %include /etc/tor/torrc.untochat as the last setting, so torrc.untochat content is included there.
Try command:
You should see something like this:
# These are the outgoing destination ports that our iptables
# rules allow. Tell Tor to use those ports only and not others.
ReachableAddresses accept *:80
ReachableAddresses accept *:443
ReachableAddresses accept *:9001
ReachableAddresses accept *:9030
# Uncomment the lines below when your installation
# is ready to offer SSH as Tor Onion Service
#HiddenServiceDir /var/lib/tor/untochat/
#HiddenServicePort 22 127.0.0.1:22
When you are ready to run your Untochat server as Tor Onion Service, you can uncomment the HiddenServiceDir and HiddenServicePort lines. After that we are almost done. To enable the new configuration tor daemon must be restarted with:
Congratulations! Your Tor Onion Service should now be up and running. To verify this, type:
We see that all is well, but how do we figure out how to access our new Tor Onion Service? We have provided no name for the service, but that is perfectly fine. We cannot decide the hostname. Instead Tor works its magic behind the scenes, and it comes up with a unique "hostname" (i.e. unique identifier) for us. We type:
We should see the Tor Onion Service hostname as something like:
$hash.onion
Note that $hash will contain stuff that looks like gibberish to many, but rest assured that it is meaningful in the Tor Network context. It identifies your service just like DNS-names do in the "normal" Internet.
Finally we wish to verify that the newly created Tor Onion Service is indeed available via Tor Network. To do that, we use our test user silver to make a "torified" SSH connection to our SSH server. Remember that you can do this test using any computer that has Tor installed and the SSH client program is torified using some method that works. It was the whole point of Untochat to allow access from many different systems.
In our case, we use Fedora Linux 28 client and we connect to Untochat with command:
Make sure that you replace $hash.onion with whatever your file /var/lib/tor/untochat/hostname contains.
If we did everything right, we should get logged in. However, the interactive SSH connection will feel slower than usual. That is because now the network traffic is routed via Tor Network. Packets pass through extra nodes and extra crypto operations are done. It all takes time. Unfortunately there is nothing we can do to speed things up, but at least we now have security and anonymity - just like we wanted.
Here are a few screenshots about a sample session with two test users, silver and jokke. You should create test users, too, so that you will learn how this system works and how to manage it.
Note that we took the screenshots before our Tor Onion Service was up. That is why you will see command ssh silver@fedora-test instead of the "torified" torsocks ssh silver@$hash.onion command. We do not want to reveal our Untochat Tor Onion Services identifiers, so we do not publish them here.


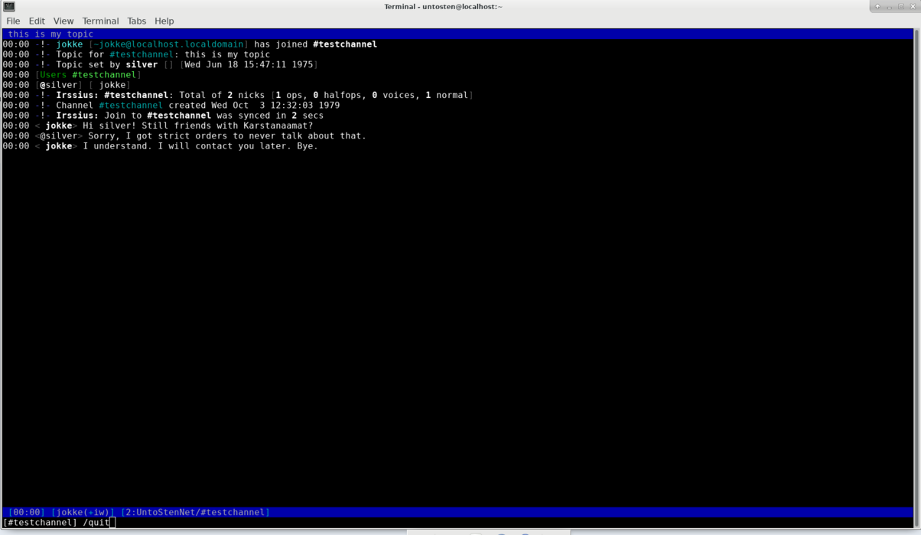
When developing Untochat, we found a pretty serious security bug in the Ansible DNF module that allows unverified RPM packages to be installed even though GPG signature verification was turned on. Later we discovered another frustrating Ansible DNF bug that also had some unfortunate security implications. In rare cases it is possible for SELinux security policy modules to be left unloaded during the install or update phase, but that failure generates no warnings, so administrators running Ansible are likely to assume everything worked fine.
In other words, we have learned the hard way that we must be extremely cautious when using these new automation tools.
To be precise, the Ansible DNF module code itself is not flawed. The bugs are in the Python DNF libraries that the Ansible module uses on the target hosts. But from an administrator's point of view, the bugs occur when you run Ansible, so the net effect is the same.
During the development, we also came across some SELinux policy issues on Fedora Linux 28. There was nothing that serious and fortunately Red Hat fixed most of the problems.
However, when trying to minimize the number of allowed SELinux domain transitions, we came across a very annoying feature of Fedora Linux selinux-policy. To do policy analysis, we ran command:
We were surprised to find out that Fedora Linux's default domain m4-macros automatically allow transitioning to domain abrt_helper_t:
Transition 4: untochat_t -> abrt_helper_t

Domain transition rule(s):
allow domain abrt_helper_t:process transition;

Set execution context rule(s):
allow untochat_t untochat_t:process { dyntransition fork getattr getcap getpgid getrlimit getsched getsession noatsecure rlimitinh setcap setcurrent setexec setfscreate setkeycreate setpgid setrlimit setsched setsockcreate share sigchld siginh sigkill signal signull sigstop transition };

Entrypoint abrt_helper_exec_t:
	Domain entrypoint rule(s):
	allow abrt_helper_t abrt_helper_exec_t:file { entrypoint execute getattr ioctl lock map open read };

	File execute rule(s):
	allow domain abrt_helper_exec_t:file { execute execute_no_trans getattr ioctl map open read };

	Type transition rule(s):
	type_transition untochat_t abrt_helper_exec_t:process abrt_helper_t;
That is not what we requested or expected. If you run:
you will see that this unwanted domain transition is allowed to tor_t too, and indeed for almost all programs! It is our opinion that this is not good.
According to our understanding abrt_helper is some kind of a utility that can send coredumps to Red Hat, or something like that. See abrt.readthedocs.io for more information.
Our installation of Fedora Linux 28 does not include abrt_helper_exec_t files, so the domain transition cannot occur as long as the situation stays like that. But for maximum security, we would like to get rid of this unwanted right to transition. According to Red Hat staff, it cannot be done if you use their standard m4 macros.
We think we could do it by creating our own versions of domain m4 macros and renaming them, but we chose not to do that.
Brought to you by Ciconia
